Installation
Follow instructions provided in the Preliminary steps section.
Check if you have the correct version of the CUDA Toolkit installed. You can check what CUDA version is required by our software in the Installing us4us software components separately section, download required CUDA Toolkit from the NVIDIA download page here.
Download the current stable version of the Drivers according to the compatibility table presented in the Installing us4us software components separately section. For Linux drivers, just use the provided link. For Windows drivers, contact us4us support for the newest version.
Install the the us4R/us4R-lite drivers. For Linux follow the Linux instructions, for Windows follow the Windows instructions. This step requires us4R/us4R-lite to be powered on and connected to the host PC.
Download the current stable version of the ARRUS, according to the compatibility table in the Installing us4us software components separately section. How to choose the correct ARRUS package (for C++/Python/MATLAB) is described in the Application Programming Interface: ARRUS section.
Install the downloaded package according to the instructions in the Application Programming Interface: ARRUS section.
If, for any reason, a firmware update is required, please follow the instructions provided in the Firmware section. Always ensure that compatible software, firmware, and hardware components are used; otherwise, when running the examples, a version incompatibility message for the software and firmware will appear.
Preliminary steps
Before you start the installation, please ensure that:
your computer meets the following requirements:
operating system: Ubuntu 20.04 or newer is recommended, Windows 10 and Windows 11 are supported,
the host PC should have an NVIDIA GPU installed, with Compute Capability >= 5.2,
the ultrasound system is powered on and properly connected to the computer – please refer to the us4R/us4R-lite User Manual for details. After connecting and powering on the ultrasound device, please reboot the host PC.
Depending on the communication interface between the ultrasound system and the computer, additional steps may be required. In particular, it may be necessary to change some of the operating system settings and/or to verify if the operating system properly detects the connected system:
for the Thunderbolt interface, please proceed to Thunderbolt-3 interface, then to PCIe ports and Thunderbolt-3 interface,
for the PCIe interface, please skip directly to PCIe ports and Thunderbolt-3 interface.
Thunderbolt-3 interface
For devices with Thunderbolt-3 interface, please check if your us4R/us4R-lite is properly connected via Thunderbolt-3 cable and is enabled in your System Settings and/or Thunderbolt Software:
Ubuntu 20.04 or newer
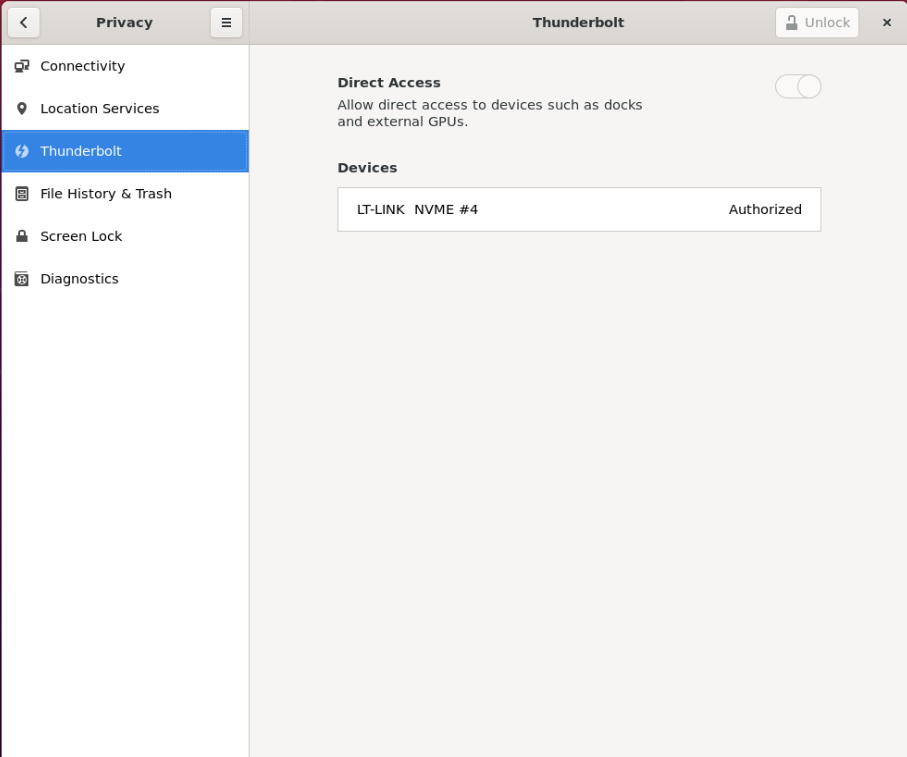
Please check in the system settings → Thunderbolt the “LT Link” device is authorized.
Alternatively, you can authorize the thunderbolt device from the command line
using the boltctl command (e.g. when you don’t have access to the
graphical interface).
Run
boltctlto determine uuid of the connected device.Run as super user:
boltctl enroll {uuid} --policy auto, where{uuid}should be the uuid of the device.
# boltctl
o LT-LINK  NVME #4
  ├─ type:          peripheral
  ├─ name:          LT-LINK NVME
  ├─ vendor:        LT-LINK
  ├─ uuid:          00a1809d-414f-1502-ffff-ffffffffffff
  ├─ status:        connected
  │  ├─ domain:     cf030000-0090-8718-23d2-7d0b9a815120
  │  └─ authflags:  none
  ├─ authorized:    fri, 14 jul 2023, 14:18:04
  ├─ connected:     fri, 14 jul 2023, 14:18:04
  └─ stored:        no
# sudo boltctl enroll 00a1809d-414f-1502-ffff-ffffffffffff --policy auto
Windows 10
Note
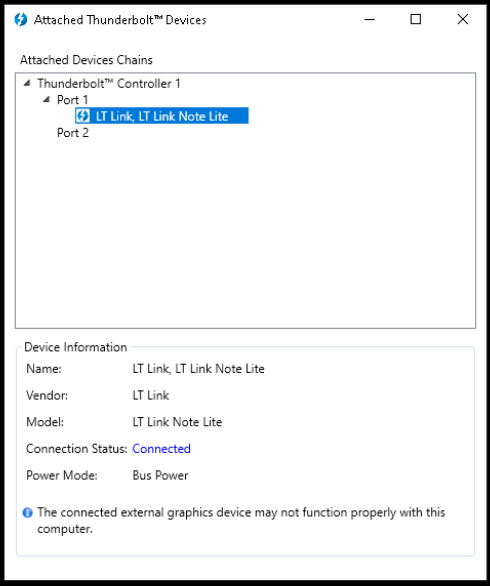
The following instructions may only be necessary for Thunderbolt-3 expansion cards. If your system does not have software installed called “Thunderbolt Software” or similar, please skip this step and proceed to the next section to check if you can
see unknown PCI Device or us4oem in the Windows Device Manager.
The Connection status should read Connected (or something similar).
PCIe ports and Thunderbolt-3 interface
For devices with Thunderbolt-3 or the direct PCI-e connection, please check if your operating system properly detected us4R/us4R-lite components:
Ubuntu 20.04 or newer
Please check the output of lspci | grep e005. You should see the output
similar to the below:
0000:98:00.0 Unclassified device [0011]: Altera Corporation Device e005
0000:99:00.0 Unclassified device [0011]: Altera Corporation Device e005
The number of output lines should be equal to the number of us4OEMs in your us4R/us4R-lite.
Note
The above output should not contain the suffix (rev ff).
If you see this suffix, this means probably you will also get the
Incompatible version firmware … actual ffffffff when running ARRUS package.
Just reconnect the Thunderbolt cable or restart your computer (in case
your are using the direct PCIe connect) and check the lspci output again.
Windows 10
Please check in the Windows Device Manager whether there are PCI Device or us4oem
nodes there, in the number equal to the number of us4OEM modules that your
us4R/us4R-lite has.
Installing us4us software components separately
The ARRUS toolkit consists of the following packages and software:
device firmware.
You can install each of these components manually, but please remember to use compatible versions, otherwise you will receive an error message that some two components are not compatible with each other.
The choice of firmware to install depends on the components your us4us system has. Below, we present the number and types of OEMs and digital backplane that are part of the systems manufactured by us4us.
System |
OEMs |
Digital backplane |
|---|---|---|
us4R, model R-2021 (legacy) |
4x - 8x us4OEM |
DBAR |
us4R, model R-2023 |
4x - 8x us4OEM+ |
DBAR |
us4R-lite, model RL-2020 (legacy - TB3) |
2x us4OEM |
DBARLite |
us4R-lite, model RL-2024-PCIe |
2x us4OEM+ |
DBAR-LitePCIe |
Firmware-software compatibility table. The current release of the software is the one listed at the top of the table.
ARRUS |
Drivers |
Us4OEM+/Us4OEM+HF Firmware |
Us4OEM Firmware |
DBAR-Lite Firmware |
DBAR-Lite-PCIe Firmware |
DBAR Firmware |
CUDA |
|---|---|---|---|---|---|---|---|
v0.12.0, Linux: 0.12.0, Windows: WD1450 |
1.0.1.0, TX: a |
0x243a5479 |
1.0.x-1.2.0 |
0x705c9732/0xc34eafc3/0xa0ef96f2 |
10.1-12.2 |
||
v0.12.0, Linux: 0.12.0, Windows: WD1450 |
1.0.1.0, TX: a |
0x243a5479 |
1.0.x-1.2.0 |
0x705c9732/0xc34eafc3/0xa0ef96f2 |
10.1-12.2 |
||
v0.12.0, Linux: 0.12.0, Windows: WD1450 |
1.0.1.0, TX: a |
0x243a5479 |
1.0.x-1.2.0 |
0x705c9732/0xc34eafc3/0xa0ef96f2 |
10.1-12.2 |
||
v0.12.0, Linux: 0.12.0, Windows: WD1450 |
1.0.1.0, TX: a |
0x243a5479 |
1.0.x-1.2.0 |
0x705c9732/0xc34eafc3/0xa0ef96f2 |
10.1-12.2 |
||
v0.12.0, Linux: 0.12.0, Windows: WD1450 |
1.0.1.0, TX: a |
0x243a5479 |
1.0.x-1.2.0 |
0x705c9732/0xc34eafc3/0xa0ef96f2 |
10.1-12.2 |
||
v0.12.0, Linux: 0.12.0, Windows: WD1450 |
1.0.1.0, TX: a |
0x243a5479 |
1.0.x-1.2.0 |
0x705c9732/0xc34eafc3/0xa0ef96f2 |
10.1-12.2 |
||
v0.12.0, Linux: 0.12.0, Windows: WD1450 |
1.0.1.0, TX: a |
0x243a5479 |
1.0.x-1.2.0 |
0x705c9732/0xc34eafc3/0xa0ef96f2 |
10.1-12.2 |
||
v0.12.0, Linux: 0.12.0, Windows: WD1450 |
1.0.1.0, TX: a |
0x243a5479 |
1.0.x-1.2.0 |
0x705c9732/0xc34eafc3/0xa0ef96f2 |
10.1-12.2 |
||
v0.12.0, Linux: 0.12.0, Windows: WD1450 |
1.0.1.0, TX: a |
0x243a5479 |
1.0.x-1.2.0 |
0x705c9732/0xc34eafc3/0xa0ef96f2 |
10.1-12.2 |
||
v0.12.0, Linux: 0.12.0, Windows: WD1450 |
2.1.1.0 |
1.0.1.0, TX: a |
0x243a5479 |
1.0.x-1.2.0 |
0x705c9732/0xc34eafc3/0xa0ef96f2 |
10.1-12.2 |
|
v0.12.0, Linux: 0.12.0, Windows: WD1450 |
2.1.1.0 |
1.0.1.0, TX: a |
0x243a5479 |
1.0.x-1.2.0 |
0x705c9732/0xc34eafc3/0xa0ef96f2 |
10.1-12.2 |
|
v0.12.0, Linux: 0.12.0, Windows: WD1450 |
2.1.1.0 |
1.0.1.0, TX: a |
0x243a5479 |
1.0.x-1.2.0 |
0x705c9732/0xc34eafc3/0xa0ef96f2 |
10.1-12.2 |
|
v0.12.0, Linux: 0.12.0, Windows: WD1450 |
2.1.1.0 |
1.0.1.0, TX: a |
0x243a5479 |
1.0.x-1.2.0 |
0x705c9732/0xc34eafc3/0xa0ef96f2 |
10.1-12.2 |
|
v0.10.0, Linux: 0.10.0, Windows: WD1450 |
2.0.5.0 |
1.0.1.0, TX: a |
0x243a5479 |
1.0.x-1.2.0 |
0x705c9732/0xc34eafc3/0xa0ef96f2 |
10.1-12.2 |
|
v0.10.0, Linux: 0.10.0, Windows: WD1450 |
2.0.5.0 |
1.0.1.0, TX: a |
0x243a5479 |
1.0.x-1.2.0 |
0x705c9732/0xc34eafc3/0xa0ef96f2 |
10.1-12.2 |
|
v0.10.0, Linux: 0.10.0, Windows: WD1450 |
2.0.5.0 |
1.0.1.0, TX: a |
0x243a5479 |
1.0.x-1.2.0 |
0x705c9732/0xc34eafc3/0xa0ef96f2 |
10.1-12.2 |
|
v0.10.0, Linux: 0.10.0, Windows: WD1450 |
2.0.5.0 |
1.0.1.0, TX: a |
0x243a5479 |
1.0.x-1.2.0 |
0x705c9732/0xc34eafc3/0xa0ef96f2 |
10.1-12.2 |
|
v0.10.0, Linux: 0.10.0, Windows: WD1450 |
2.0.4.0 |
1.0.1.0, TX: a |
0x243a5479 |
1.0.x-1.2.0 |
0x705c9732/0xc34eafc3/0xa0ef96f2 |
10.1-12.2 |
|
v0.10.0, Linux: 0.10.0, Windows: WD1450 |
2.0.4.0 |
1.0.1.0, TX: a |
0x243a5479 |
1.0.x-1.1.0 |
0x705c9732 |
10.1-12.2 |
|
v0.10.0, Linux: 0.10.0, Windows: WD1450 |
2.0.4.0 |
1.0.1.0, TX: a |
0x243a5479 |
1.0.x-1.1.0 |
0x705c9732 |
10.1-12.2 |
|
v0.10.0, Linux: 0.10.0, Windows: WD1450 |
2.0.4.0 |
1.0.1.0, TX: a |
0x243a5479 |
1.0.x-1.1.0 |
0x705c9732 |
10.1-12.2 |
|
v0.10.0, Linux: 0.10.0, Windows: WD1450 |
2.0.4.0 |
1.0.1.0, TX: a |
0x243a5479 |
1.0.0-1.0.2 |
0x705c9732 |
10.1-12.2 |
|
v0.10.0, Linux: 0.10.0, Windows: WD1450 |
2.0.4.0 |
1.0.1.0, TX: a |
0x243a5479 |
1.0.0-1.0.2 |
0x705c9732 |
10.1-12.2 |
|
v0.10.0, Linux: 0.10.0, Windows: WD1450 |
2.0.4.0 |
1.0.1.0, TX: a |
0x243a5479 |
1.0.0-1.0.2 |
0x705c9732 |
10.1-12.2 |
|
v0.9.0, Linux: 0.2.0, Windows: WD1450 x |
x |
0x0f255c84, TX: a |
0x243a5479 |
x |
0x705c9732 |
10.1-12.2 |
|
v0.8.7, Linux: 0.1.5, Windows: WD1450 |
x |
0xbd612458, TX: a |
0x243a5479 |
x |
0xffe07334 |
10.1-12.2 |
|
v0.8.7, Linux: 0.1.5, Windows: WD1450 |
x |
0xbd612458, TX: a |
0x243a5479 |
x |
0xffe07334 |
10.1-12.2 |
|
v0.8.7, Linux: 0.1.5, Windows: WD1450 |
x |
0xbd612458, TX: a |
0x243a5479 |
x |
0xffe07334 |
10.1-12.2 |
|
v0.8.7, Linux: 0.1.5, Windows: WD1450 |
x |
0xbd612458, TX: a |
0x243a5479 |
x |
0xffe07334 |
10.1-12.2 |
|
v0.8.7, Linux: 0.1.5, Windows: WD1450 |
x |
0xbd612458, TX: a |
0x243a5479 |
x |
0xffe07334 |
10.1-12.2 |
|
v0.8.7, Linux: 0.1.5, Windows: WD1450 |
x |
0xbd612458, TX: a |
0x243a5479 |
x |
0xffe07334 |
10.1-12.2 |
|
v0.8.6, Linux: 0.1.5, Windows: WD1450 |
x |
0xbd612458, TX: a |
0x243a5479 |
x |
0xffe07334 |
10.1-12.2 |
|
v0.8.6, Linux: 0.1.5, Windows: WD1450 |
x |
0xbd612458, TX: a |
0x243a5479 |
x |
0xffe07334 |
10.1-12.2 |
|
v0.8.6, Linux: 0.1.5, Windows: WD1450 |
x |
0xbd612458, TX: a |
0x243a5479 |
x |
0xffe07334 |
10.1-12.2 |
Drivers
Linux
Download the linux driver then in command line run:
sudo chmod +x {us4r-driver.run}
sudo ./{us4r-driver.run}
where {us4r-driver.run} is the name of the downloaded file.
After executing the above command, there should be us4oem* nodes in the /dev
folder, e.g.:
# ls /dev/us4oem*
/dev/us4oem9800  /dev/us4oem9900
Warning
Currently it is necessary to re-run the above installer after every Linux Kernel upgrade (which may be performed silently in the background by Ubuntu). This inconvenience will be fixed in the future.
Windows
Download and extract
us4oem-drivers-1450.zip(contact us4us support to make sure you get the newest version).Run
install.batwith administrative privileges. Confirm driver installation if necessary.
us4oem and WinDriver1450 nodes should now be visible in the
Device Manager.
Firmware
Note
Usually, the hardware we provide already has the latest stable firmware version installed – so it is likely that you can skip this step. Use the instructions below only if you would like to test a newer, _develop_ version of the firmware and software.
Download the appropriate firmware version (and the appropriate suffix: -linux: Linux, no suffix: Windows) from this page,
extract and run update.bat (update.sh on Linux).
After the update, please remember to do a full power cycle of the us4R/us4R-lite and the connected PC.
Application Programming Interface: ARRUS
We provide our application programming interface as a part of the ARRUS package.
The list of the ARRUS package releases is available here. Download and extract the package for the programming language you want to use.
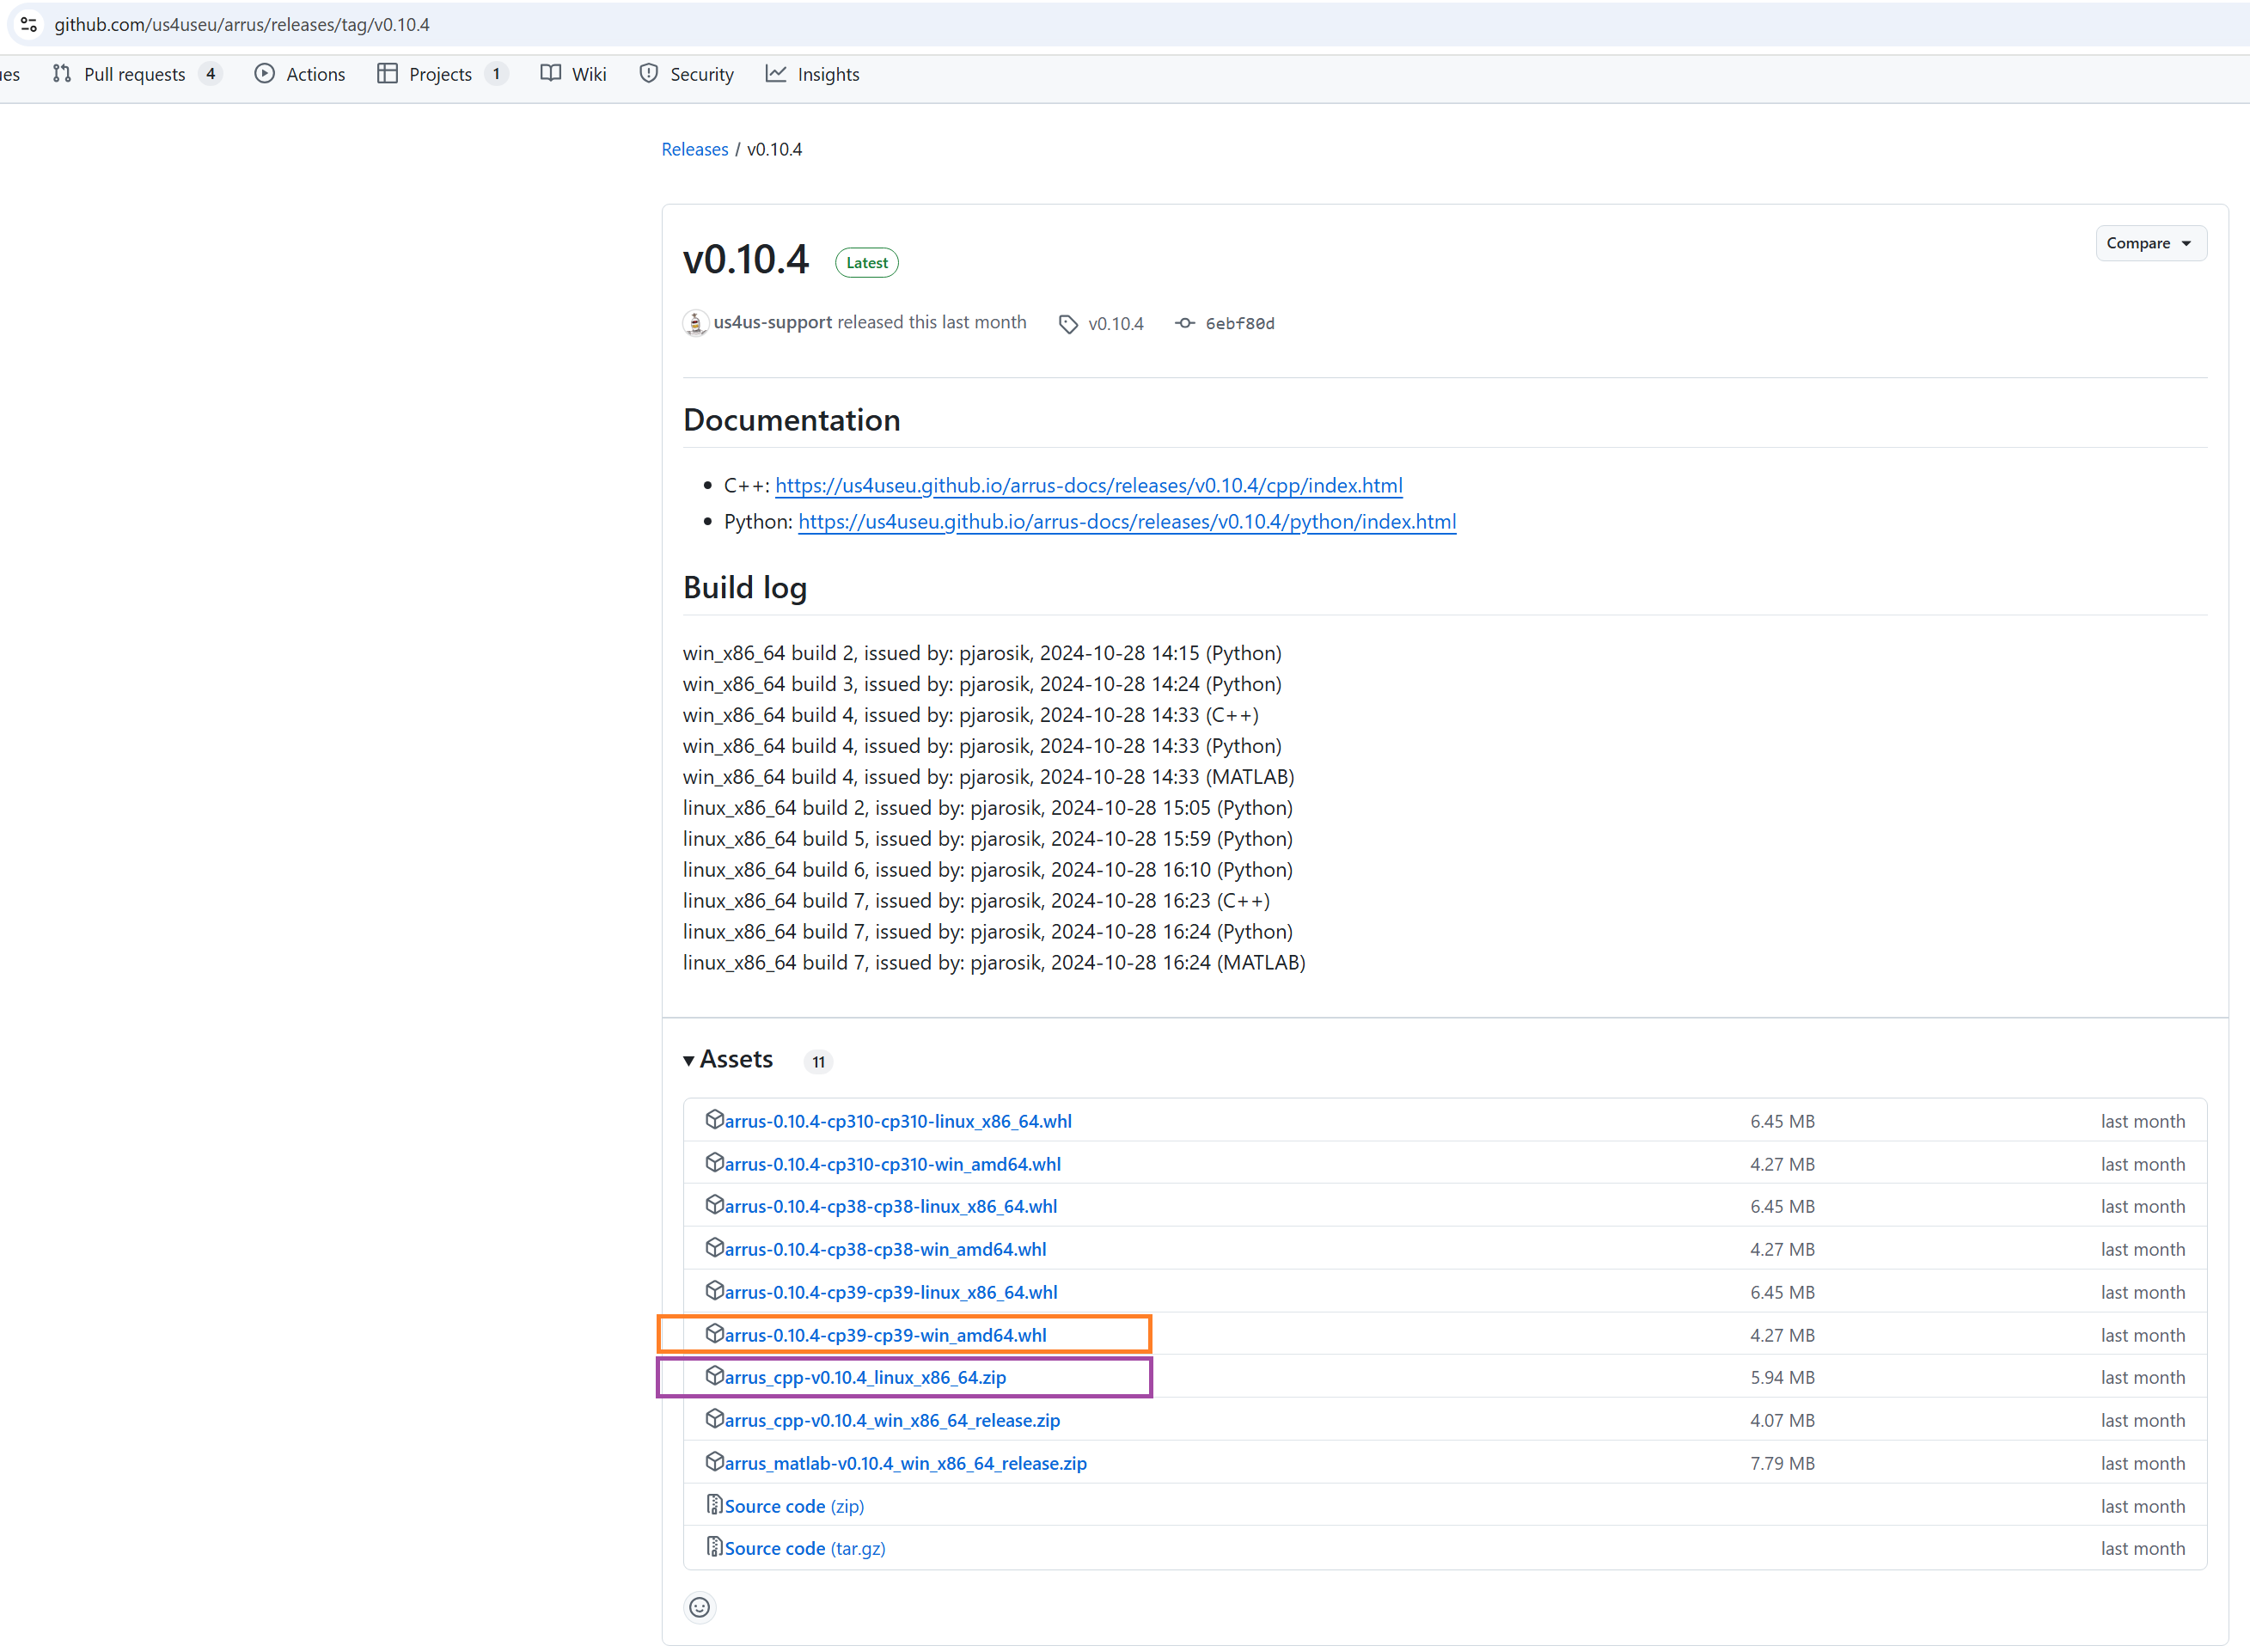
From the list of Assets available for each ARRUS version, choose the one that matches your application.
e.g. for Windows environment and Python 3.9 you should download
arrus-0.10.4-cp39-cp39-linux_x86_64.whl package, for Linux and C++ you should download arrus_cpp-v0.10.4_linux_x86_64.zip package etc.
Symbol key:
cpstands for Python (C implementation of Python, i.e. CPython), e.g.,cp310means Python 3.10,cp39means Python 3.9, and so on.cppstands for C++.matlabstands for Matlab.winorlinuxindicate the operating system. NOTE: the Python packages with the win_amd64.whl suffix can be used for both AMD and Intel processors.
Python
Requirements:
Python 3.10-3.12 (3.8-3.10 for ARRUS < 0.12.0).
We recommend using Miniconda3 to manage Python environments.
Install whl package located in the python subdirectory using
pip package manager:
pip uninstall arrus
pip install  arrus-x.y.z-cp310-cp310-win_amd64.whl
Where x.y.z is the current version of ARRUS package.
The below packages are required to run the example with B-mode imaging:
pip install cupy-cudaxyz matplotlib==3.7.2
Where xyz is the version of the CUDA Toolkit installed on your host PC.
To check if everything is OK, run one of the examples provided
here
and described here. For example, to run plane_wave_imaging.py:
Update path in the
with arrus.Session()...call to the.prototxtfor your system.Adjust HV voltage.
Run it:
python plane_wave_imaging.py.
If you would like to run one of our arrus-toolkit examples / technotes, you will have to install gui4us in your Python environment. To do that, just run the following command:
pip install gui4us


